NEW ETSY WEBSITE COMING SOON!! Now under construction!

December 28, 2009

Woodshop Update! Entertainment center is done!

Wow, I'ts been a while since my last post! So much for keeping up the weekly updates... I've been increasingly busy the closer we get to the new year. Since my last post, I've completed the Rustic Low Entertainment Center and begun on a new and exciting project. I had final exams at school which was a crazy week, lots going on at the fire station, Christmas shopping and travel, helping friends move, picking up materials for the new project, a new tool purchase, more shop wiring, and on and on. I guess that's how I prevent boredom!


The start of my drive over to the valley to deliver the entertainment center. This is why I love being in Central Oregon!


Another great view on the drive. Not ugly.


Look at the size of that TV! Now you see why the entertainment center was so big. It barely fit in the back of the pickup! I'm really proud of the way it matches the bookshelf next to it.


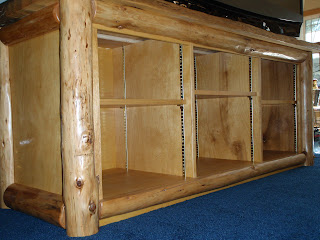
 Good view of the fully adjustable shelving and little textures on the log work.


Unfortunately, I don't think I took any close up detail pictures of the wire cutouts, which you can almost see here on the bottom shelf. I mentioned in an earlier post that I put countless hours of work into custom making them, even though they're just going to be covered up anyway, but I'm super happy with how they turned out. It's little details like that that allow me to sleep at night.


Here's the railing at the house I made several years earlier. It's made from fir and maple, and another project that makes me smile. The entertainment center is in the darkness in the background. You can't buy this stuff at Pier One, and it's not made in China. Custom made by yours truly. Yeah!


Detail of another section of the railing. No screws or nails were used. The only metal fasteners are lags used on the main fir uprights.


Not my best photography work, but still a great view of one long section of railing work I did at the house.

November 12, 2009

Entertainment ctr. finishing touches

Today was a fairly productive day in the shop. It's just after 11pm and I'm finally calling it quits for the day. I'll try to get this published before I fall asleep on the keyboard...


This is how the other day started. I went to the table saw to make a quick cutoff as I had any other time, only when I hit the switch, nothing happened. No motor tuning on, no whirr of the blade as it fires up, nothing. After trouble shooting the cords, plug ins and switches, I found the saboteur- a cord had welded itself to the plug in! I'm no electrical genius or anything, but I'm sure this is not so good.
Ran over to Ace hardware to get the replacement and some additional advice. Turns out the wires were crossed over to the wrong terminals when it was originally done by the previous owner.

Aso, realized the saw pulls 17-20 amps on startup, but was wired with only 15a plugs.
Back to the hardware store for the appropriate wall plugs. Then I remembered the cord was only 10 long, and I needed a 20' run straight to the plug so we could bypass the whole trouble next time. Since one end of the extension cord was fried in the meltdown, I just cut off the offending piece and chucked it aside, then replaced with the leftover heavy duty extension cord. Wired hot right to the saw! It hasn't caught on fire yet!!!


The west end of the cabinet, log work jointed, sawn, dadoed, sanded, nailed in, and casework completed! Looking good. Tomorrow it's breaking out the spray equipment for 3-6 final protective coats.


Not too fast though, because the plug through caps arent quite done. They just need a little more sanding in the morning, some glue and they slide right in. I left the heater going all night in the shop so we'll have a nice even temperature for spray application.


The new hollow chisel mortiser in action already. I love it!


This thing does some pretty amazing stuff. The mortiser hollws out all the square holes as shown here. Next I'll finish chopping out the middle 'rails' to form the hole in the cabinet back to pass cords through.


Sanding out the holes that'll be seen from the front- for all of probably 30 seconds before a playstation gets set in front of it.


WOOD AS ART!
This was my backer piece for mortising out all the holes, mainly just to keep from drilling down into the base of the machine. Kinda looks cool.

November 1, 2009

Closing in!

We got tons done today, and it's starting to look like a real piece of furniture as opposed to just a few hunks of plywood stacked up together!

I got the dado all set up on the table saw, and after 2 days of staring at the wood trying to figure out how to cut the corner pieces, I simplified my jig to make it as easy as possible. The log rides on this plywood sled, secured with just a couple screws through the back.


A corner log, ready for the final pass.


Top going on!!


Mixing up a little pixie dust- lots of glue and some sawdust from the sander, mixed up and used to fill in wood defects as needed...


...then you just work it into the grain.


Starting to look pretty good.

 
A cool little detail- another great reason to buy local- you don't get this stuff too often in commercially built furniture- especially for any resemblance of fair price.

October 25, 2009

Pine (re)finishing troubles!

After a week of studying for midterms, I was eager to get back to work. I took the pine slab top to Mark at Creative Furniture Designs here in Bend. Mark has an overhead wide belt sander that can handle 48" wide planks. I was guessing it would take him about 15 or 20 minutes to get the slab dead-flat, where as it would take me 3 days of hand planing and sanding to have only a mostly flat surface. After 50 passes and an hour later, Mark had it looking good. I WAY underestimated that one!


Here's the slab, fresh back from the widebelt sander.


Adding a little texture to the top with a wide belt sander, to give the look and feel of a rustic milled board 50 years older than it is.


I had read about these new sanding disks, made of stainless steel, that attach to a random orbit sander. They're supposed to replace something like 5 times the amount of normal sanding pads you use. After only 5 minutes of use, I decided they are garbage. 

 
Here's how one looks installed, with another next to it showing the velcro mounting setup on the back. They don't stick to the base of my sander very well, and have a tendency to shoot off during use.  If I can find the receipt, they're going back to the hardware store today.


To match the cabinet base, I wanted to stick with Danish oil finish on the slab as well. Oils can be problematic with soft woods such as pine, so I took the extra step of prefinishing with a clear coat before wiping on the matching oil finish. After about 10 minutes, I came back and found the oil had still managed to blotch up. This is caused by different areas absorbing more of the pigment than others, and makes a "spotty" looking finish.


You can't see the blotching as bad from further away, but I still know it's there. I let the finish dry thoroughly for a day so it doesn't ruin the sanding belts, and today I'll be removing it all with the belt sander. Then, back to the beginning and refinishing with a primary wash coat of shellac.

Hopefully by tonight I'll have a new finish drying on things.

**7pm Update:


Belt sanding the old finish off.


After belt sanding from 50 grit, 80, then 120, I switched to the palm sander. I started again at 120 and went down to 220. I had to remove a good deal of material to get down to where the finish hadn't soaked through.


I gave the whole top 2 healthy coats of wood conditioner, wiped off the excess, then poured some stain into a finish cup.


After waiting 2 hours, I applied the second coat of stain to ensure an even coat. You can start to see the finish really bring out the color here. It was a pain in the butt, but I'm really glad I decided to refinish this piece.


Wiping off the excess stain. While that cures over the next 2 days, I'll be milling an installing face frame material to help shore up the cabinet, cutting a profile in the shelves, drilling holes for wires, cutting the log details,  and doing some glue up and finishing.


October 13, 2009

A cold day for finishing.

Woke up to temps in the low 20's this morning. Armed with a hot cup of coffee I ventured out into the shop to test the waters. Even with the heaters off overnight it was relatively warm out there. I say relatively, because it was probably still below 40 degrees when I started sanding at 8 in the morning.

 What the Jeep looked like at 10 in the morning when I headed out for more sandpaper. Needless to say, I was scraping ice for a while before I went anywhere.


 I made these little blocks for holding shelves while they're getting finish applied. They hold the piece up off the table so it doesn't get  dust in the finish. After finishing one side of the shelf, you flip it over and set the panel on the small tips. Because they come to a soft point, they leave only minimal marking on the wet finish. You can see them in use on the picture below.


I love the way the Danish oil finish makes the wood color "pop" like this. It's really important to sand the heck out of the panels with progressively finer grits, otherwise the finish will blotch up and look rather funky from uneven absorption. I used 220 grit to finish sand and ease all the sharp edges before oiling.

The cabinet is pretty much all done with the oil, so over the next few days while that's curing I'll work on milling the log accents and planing the top pine slab. I also realized I glued up the back panel before cutting holes for cords, so I'll have to retro fit the space for those too.

1st stage of finishing begins!


Applying my favorite finish, hand rubbed Danish Oil, to the cabinet interior.


The blue tape comes in handy for areas you want good glue adhesion later, like the face frames.


This is what I woke up to this morning. Put me in a good mood all day.


I spent the first hour in the shop sanding. It's about 25 degrees Fahrenheit here. Had to keep the doors open so the air would move the dust out. It did not make it very comfortable!


Attaching some extra supports in the base. After I was done sanding I was able to close the garage up and turn on some heat for this part! WAY more comfy.

October 8, 2009

Post Marathon short work week

 
 This was a big week in the shop despite not being able to move after running the Portland Marathon. I got some more edge banding done to the shelves and front rail of the cabinet base. This picture is a close up of the edge banding on one of the shelves, just after starting to plane down the thickness.


And here's the same edge after hand planing and scraping. Take a close look at how fine the shavings come off with the scraper. Makes for a beautiful joint.


Reclaimed maple door jams that I'm going to mill up for face frame material.


Pulling off the rabbeted piece with a pry bar.


Gluing on the base of the cabinet.


A very nice slab of pine that I picked up from Brian Kennel Custom Milling today. He's got all kinds of slabs and dimensional wood in his storage area. Literally. We climbed around and over piles of different wood species for a while as he was showing me all the variety he has. Juniper, pine, fiddleback maple, spalted oak, spalted butternut, and my personal favorite, a 12x12 beam of Indonesian Teak, about 16 feet long. I regret not taking my camera with me!
And how does a guy without a pickup truck and a mounted rooftop cargo box get a slab like this home, you might be wondering?


You drive it. Yes, that's a 2" thick, 6 foot long slab of wood riding shotgun. Good thing I didn't have to cross traffic on the way home!

October 2, 2009

Rustic Low Entertainment Center, Shelf Day


Maple door jams, reclaimed from an old school, soon to be milled into the edge banding for the shelves and dividers.


A couple of nail holes that'll be removed when I rip down the boards to width.


Gluing up the edge banding to the main structure of the cabinet carcass.


I took a day to do some much needed sharpening on my hand planes before planing down the edge banding. It took a large chunk of time away from the project, but had to be done. Here I'm just getting back to some planing work. Sharpening with wet stones is a messy process, thus the exam gloves. The tiny metal particles from the blades mix in water create a slurry, which finds its way into every nook and cranny in my hands.  Can you spot the restless shop dog in the background?


 The curly ribbons from a sharp plane.


Paper thin shavings of maple from the edge banding.


After planing down the edge banding to match the thickness of the plywood, the next step is to take a card scraper to it to really fine tune that joint. When it comes time for sanding, I'll only barely have to hit the area that I covered with the scraper because of the very fine particles it removes.


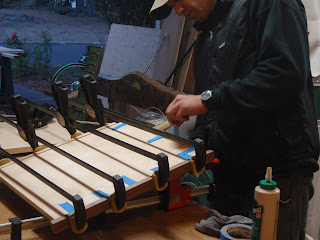
Gluing up the edge banding on the 3 shelves. This is just one of the shelves being done, and it took 11 or 12 clamps before I felt the pressure was evenly distributed... and that's all the long clamps I had!

...This is a perfect example of why you can never have enough clamps for a project like this. Having to glue and clamp each shelf individually was extremely time consuming.


Gluing edge banding on the last shelf. It went much faster the third time after all that practice. The blue tape holds the maple edge banding to the plywood after glue is applied. That way the piece wont shift around as you try to secure the clamps.

After about 20 minutes of set up time, the excess glue is scraped off with a sharp chisel or putty knife so it wont leave marks when stain is applied.