Maple door jams, reclaimed from an old school, soon to be milled into the edge banding for the shelves and dividers.
A couple of nail holes that'll be removed when I rip down the boards to width.
Gluing up the edge banding to the main structure of the cabinet carcass.
I took a day to do some much needed sharpening on my hand planes before planing down the edge banding. It took a large chunk of time away from the project, but had to be done. Here I'm just getting back to some planing work. Sharpening with wet stones is a messy process, thus the exam gloves. The tiny metal particles from the blades mix in water create a slurry, which finds its way into every nook and cranny in my hands. Can you spot the restless shop dog in the background?
The curly ribbons from a sharp plane.
Paper thin shavings of maple from the edge banding.
After planing down the edge banding to match the thickness of the plywood, the next step is to take a card scraper to it to really fine tune that joint. When it comes time for sanding, I'll only barely have to hit the area that I covered with the scraper because of the very fine particles it removes.
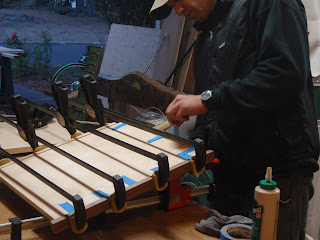
Gluing up the edge banding on the 3 shelves. This is just one of the shelves being done, and it took 11 or 12 clamps before I felt the pressure was evenly distributed... and that's all the long clamps I had!
...This is a perfect example of why you can never have enough clamps for a project like this. Having to glue and clamp each shelf individually was extremely time consuming.
Gluing edge banding on the last shelf. It went much faster the third time after all that practice. The blue tape holds the maple edge banding to the plywood after glue is applied. That way the piece wont shift around as you try to secure the clamps.
After about 20 minutes of set up time, the excess glue is scraped off with a sharp chisel or putty knife so it wont leave marks when stain is applied.


No comments:
Post a Comment