NEW ETSY WEBSITE COMING SOON!! Now under construction!

June 30, 2010

Chicken Coop Preview

I finally got a couple weeks off from school after wrapping up classes. Since my woodshop is still in storage until after my internship, I got back to my roots a little and did some construction. I've been working on this chicken coop pretty much full time.

There's a little left to finish, but here's a preview of the end result.


A quick sketch of the plan.


There's more to come on the chicken coop, but I need to finish up the updates on the Barnwood Coffee Table build first. Hopefully, I'll get some time this month.

April 4, 2010

Barnwood coffee table

Ok, ok, I know it's been a long time since my last blog post, but school has been pretty overwhelming lately. I've come to the realization that this whole paramedic program rules my life right now, and realistically if I want school to be worthwhile, I have to put the woodshop on hold. It breaks my heart, but that's how it's gotta be.
That said, I still haven't posted my latest work. Late last year, I got a call from Gus for a custom coffee table order. When I asked him what kind of look or design he was after, he just said, "I donno, just make it cool, make it 'Casey cool'. Make it something you cant buy from a store. I want people to walk in and go 'Whoa, where'd you buy that?', so I can say to them 'You can't buy one, you gotta call Casey to have him make one.'"


So to the drawing board I went. After mulling it over for a good couple of weeks, I decided on barnwood and hammered copper. It had to be unique, so I gave it a lot of extra detail. I designed in mortise and tenon joints, hand flamed and hammered copper inlay panels with square nail and square peg accents.


Square pegs. I love square pegs.

I like the way this shot shows a variety of details. The copper and tacks, good sawkerf texture, the texture on the magazine rack bottom level, and the faux through tenon.

A great view of the tack work.

One of the benefits of being in Central Oregon is that wood rot is easy to stabilize once removed from the elements and stored in a dry place. You get some extremely detailed points of interest, created by mother nature, as seen on the corner here. A couple square pegs top off the look.


The magazine level of the coffee table, made from old barn siding. You don't get much better weathering and character than this. Again, topped off by 100 year old hand cut square nails.


The matching piece on the opposite side of the magazine level. The wax finish just makes it pop like crazy. You can't help but run your hand over the texture of these old boards.

And now some of the construction process:

I added on some pine stock to beef up the underside of the top. It added a couple days to the project, but I wanted to be sure the weathered wood would be able to hold up the copper panels once in place without splitting out on the bottom. 


The new pine, after being planed down flush with the old pine.
 You can tell the old pine wood came from a much older tree by the tight grain lines when compared to the faster grown pine strip I added in. 
 Doing a little clean up on the mortise after adding the pine strip.


Here's a picture of the side board before I glued in the pine strip. The piece I'm working on was a piece that was not terribly stable. I removed it carefully in order to glue it back in, thereby making it much more likely to last down the road.


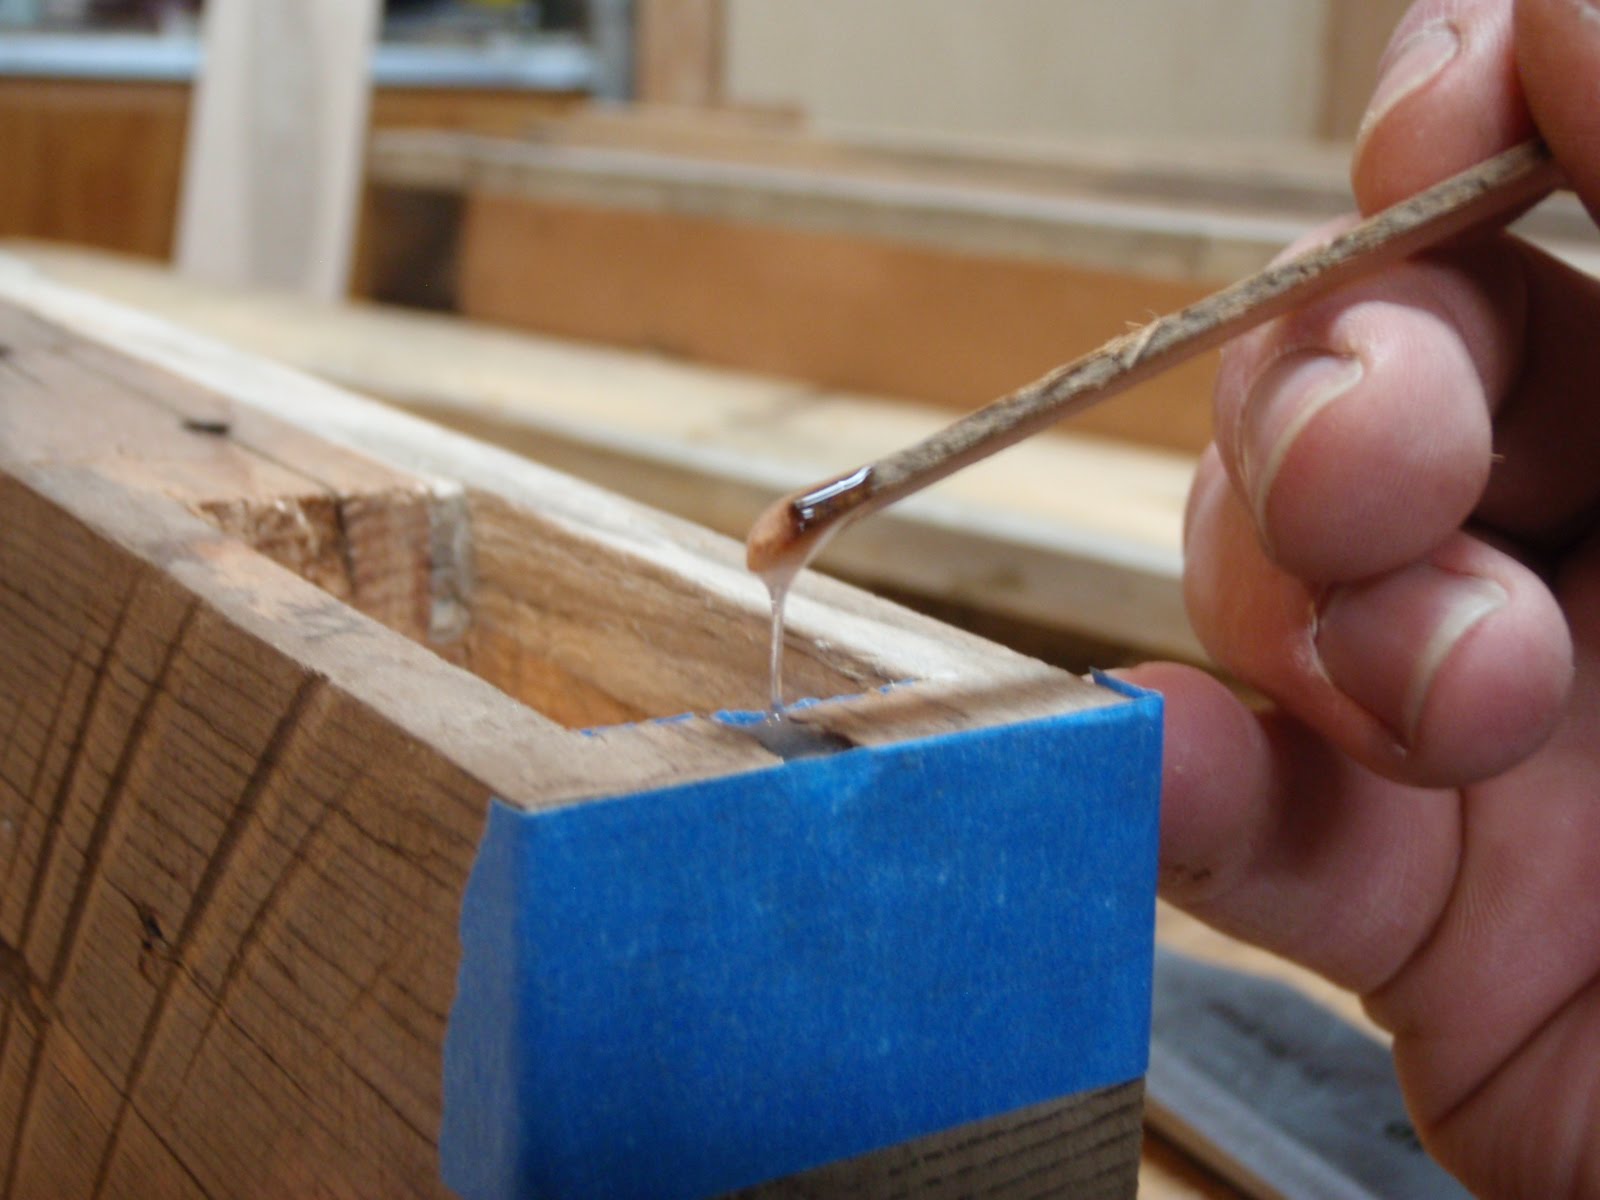
A little epoxy filler on the end grain to stabilize an old nail hole.


Planing down the new pine strip with my Stanley low angle block plane. Probably my favorite hand tool in my shop right now.
 Here's the table before gluing and finishing. I was toying with different ideas for the bottom magazine level with various sized boards I had. I decided at this point that the top overhung the side rails too much, so you couldn't see the detail in them if standing close to the table. I tore it all apart and resized the top. That meant recutting all the mortises and tenons, another weeks worth of work.


Resizing the top also meant I had to resize my panels, which I had already adhered to the copper. I had to get creative to do it, which involved flipping the panels upside down on the tablesaw and running them on a backer panel to prevent scratching the copper. It shot copper shards into my clothes, arms and the garage door panel behind me, as well as creating the pretty scary edge in the picture.


This is what happens when you have to "get creative" with sharp copper! I'm still digging the copper shards out of this shirt.


Final glue-up on the top panel.
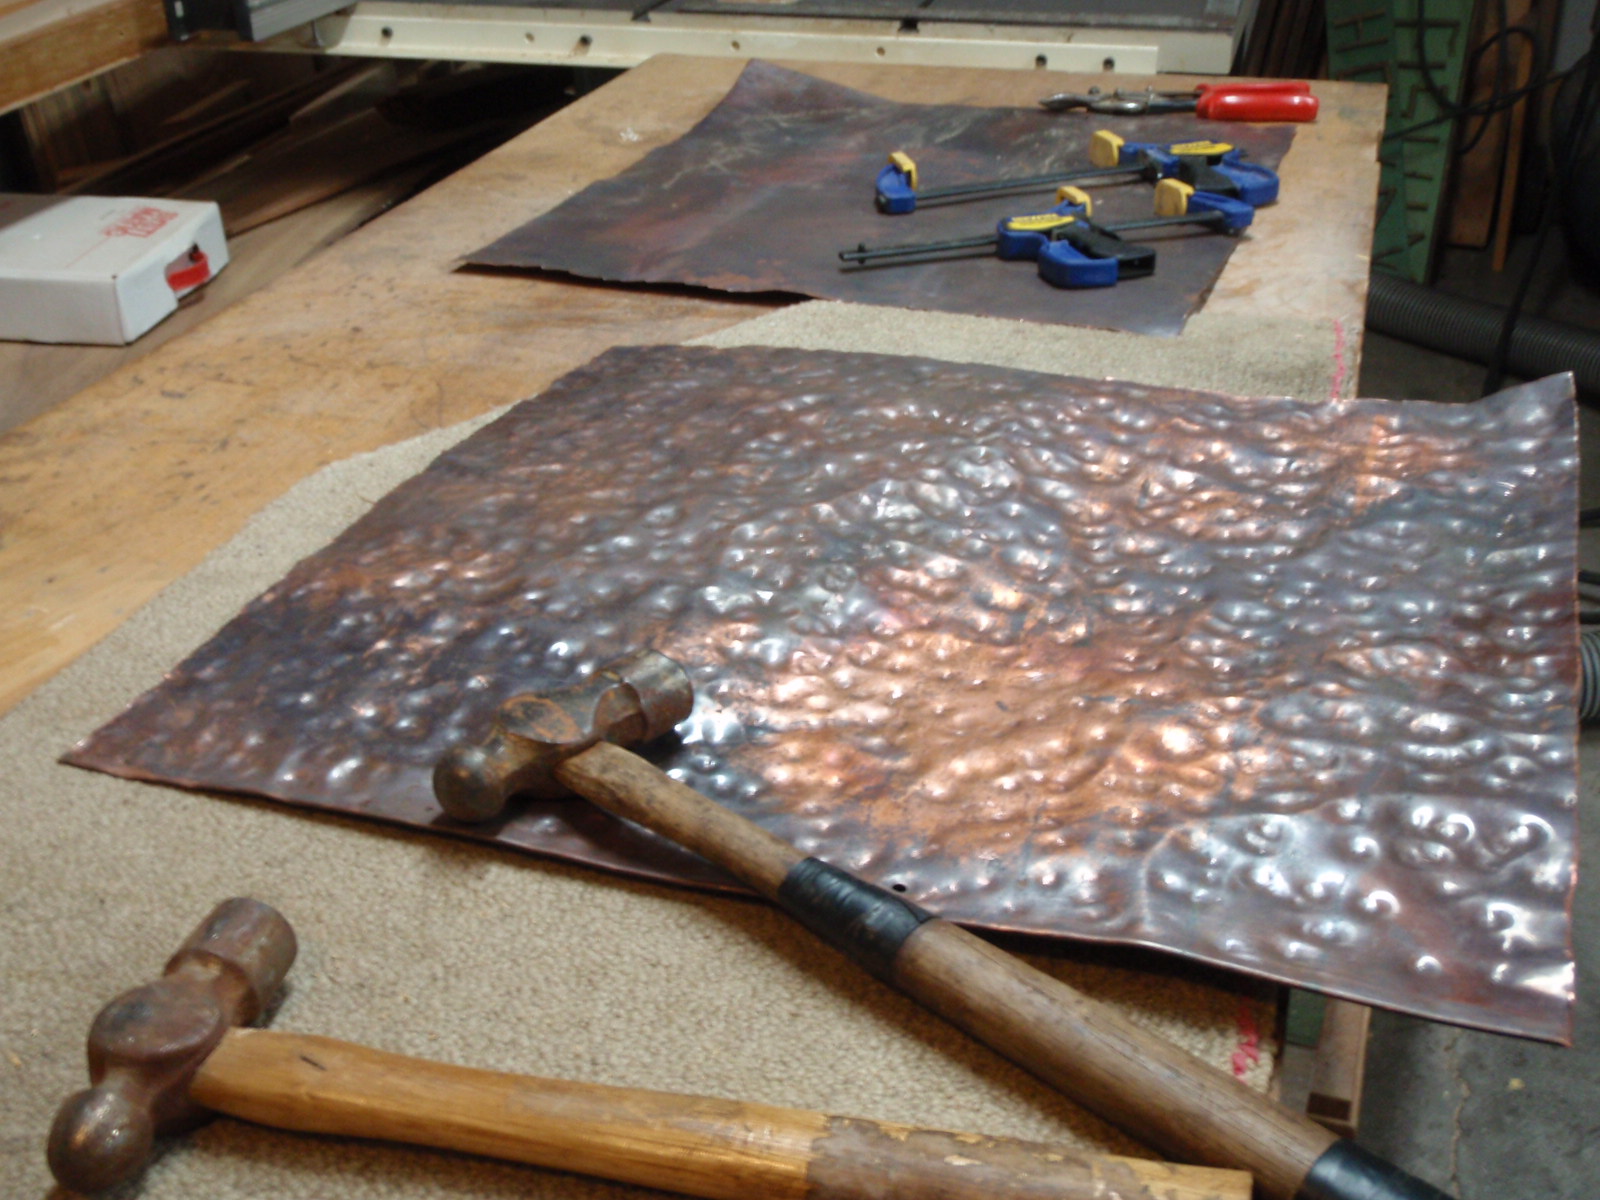
 How a hand hammered finish works: 1. Get a sheet of copper. 2. Grab a pair of ball-peen hammers. 
3. Earplugs in. 4. Apply hammers to copper in random fashion. (Get crazy!)


That's about all I have time to add to the blog today. Next time, I'll add some more 'in-process' pictures, with a few of the copper process and making the tenons for the table top. Thanks for looking!


December 28, 2009

Woodshop Update! Entertainment center is done!

Wow, I'ts been a while since my last post! So much for keeping up the weekly updates... I've been increasingly busy the closer we get to the new year. Since my last post, I've completed the Rustic Low Entertainment Center and begun on a new and exciting project. I had final exams at school which was a crazy week, lots going on at the fire station, Christmas shopping and travel, helping friends move, picking up materials for the new project, a new tool purchase, more shop wiring, and on and on. I guess that's how I prevent boredom!


The start of my drive over to the valley to deliver the entertainment center. This is why I love being in Central Oregon!


Another great view on the drive. Not ugly.


Look at the size of that TV! Now you see why the entertainment center was so big. It barely fit in the back of the pickup! I'm really proud of the way it matches the bookshelf next to it.


 Good view of the fully adjustable shelving and little textures on the log work.


Unfortunately, I don't think I took any close up detail pictures of the wire cutouts, which you can almost see here on the bottom shelf. I mentioned in an earlier post that I put countless hours of work into custom making them, even though they're just going to be covered up anyway, but I'm super happy with how they turned out. It's little details like that that allow me to sleep at night.


Here's the railing at the house I made several years earlier. It's made from fir and maple, and another project that makes me smile. The entertainment center is in the darkness in the background. You can't buy this stuff at Pier One, and it's not made in China. Custom made by yours truly. Yeah!


Detail of another section of the railing. No screws or nails were used. The only metal fasteners are lags used on the main fir uprights.


Not my best photography work, but still a great view of one long section of railing work I did at the house.

November 12, 2009

Entertainment ctr. finishing touches

Today was a fairly productive day in the shop. It's just after 11pm and I'm finally calling it quits for the day. I'll try to get this published before I fall asleep on the keyboard...


This is how the other day started. I went to the table saw to make a quick cutoff as I had any other time, only when I hit the switch, nothing happened. No motor tuning on, no whirr of the blade as it fires up, nothing. After trouble shooting the cords, plug ins and switches, I found the saboteur- a cord had welded itself to the plug in! I'm no electrical genius or anything, but I'm sure this is not so good.
Ran over to Ace hardware to get the replacement and some additional advice. Turns out the wires were crossed over to the wrong terminals when it was originally done by the previous owner.

Aso, realized the saw pulls 17-20 amps on startup, but was wired with only 15a plugs.
Back to the hardware store for the appropriate wall plugs. Then I remembered the cord was only 10 long, and I needed a 20' run straight to the plug so we could bypass the whole trouble next time. Since one end of the extension cord was fried in the meltdown, I just cut off the offending piece and chucked it aside, then replaced with the leftover heavy duty extension cord. Wired hot right to the saw! It hasn't caught on fire yet!!!


The west end of the cabinet, log work jointed, sawn, dadoed, sanded, nailed in, and casework completed! Looking good. Tomorrow it's breaking out the spray equipment for 3-6 final protective coats.


Not too fast though, because the plug through caps arent quite done. They just need a little more sanding in the morning, some glue and they slide right in. I left the heater going all night in the shop so we'll have a nice even temperature for spray application.


The new hollow chisel mortiser in action already. I love it!


This thing does some pretty amazing stuff. The mortiser hollws out all the square holes as shown here. Next I'll finish chopping out the middle 'rails' to form the hole in the cabinet back to pass cords through.


Sanding out the holes that'll be seen from the front- for all of probably 30 seconds before a playstation gets set in front of it.


WOOD AS ART!
This was my backer piece for mortising out all the holes, mainly just to keep from drilling down into the base of the machine. Kinda looks cool.

November 1, 2009

Closing in!

We got tons done today, and it's starting to look like a real piece of furniture as opposed to just a few hunks of plywood stacked up together!

I got the dado all set up on the table saw, and after 2 days of staring at the wood trying to figure out how to cut the corner pieces, I simplified my jig to make it as easy as possible. The log rides on this plywood sled, secured with just a couple screws through the back.


A corner log, ready for the final pass.


Top going on!!


Mixing up a little pixie dust- lots of glue and some sawdust from the sander, mixed up and used to fill in wood defects as needed...


...then you just work it into the grain.


Starting to look pretty good.

 
A cool little detail- another great reason to buy local- you don't get this stuff too often in commercially built furniture- especially for any resemblance of fair price.

October 25, 2009

Pine (re)finishing troubles!

After a week of studying for midterms, I was eager to get back to work. I took the pine slab top to Mark at Creative Furniture Designs here in Bend. Mark has an overhead wide belt sander that can handle 48" wide planks. I was guessing it would take him about 15 or 20 minutes to get the slab dead-flat, where as it would take me 3 days of hand planing and sanding to have only a mostly flat surface. After 50 passes and an hour later, Mark had it looking good. I WAY underestimated that one!


Here's the slab, fresh back from the widebelt sander.


Adding a little texture to the top with a wide belt sander, to give the look and feel of a rustic milled board 50 years older than it is.


I had read about these new sanding disks, made of stainless steel, that attach to a random orbit sander. They're supposed to replace something like 5 times the amount of normal sanding pads you use. After only 5 minutes of use, I decided they are garbage. 

 
Here's how one looks installed, with another next to it showing the velcro mounting setup on the back. They don't stick to the base of my sander very well, and have a tendency to shoot off during use.  If I can find the receipt, they're going back to the hardware store today.


To match the cabinet base, I wanted to stick with Danish oil finish on the slab as well. Oils can be problematic with soft woods such as pine, so I took the extra step of prefinishing with a clear coat before wiping on the matching oil finish. After about 10 minutes, I came back and found the oil had still managed to blotch up. This is caused by different areas absorbing more of the pigment than others, and makes a "spotty" looking finish.


You can't see the blotching as bad from further away, but I still know it's there. I let the finish dry thoroughly for a day so it doesn't ruin the sanding belts, and today I'll be removing it all with the belt sander. Then, back to the beginning and refinishing with a primary wash coat of shellac.

Hopefully by tonight I'll have a new finish drying on things.

**7pm Update:


Belt sanding the old finish off.


After belt sanding from 50 grit, 80, then 120, I switched to the palm sander. I started again at 120 and went down to 220. I had to remove a good deal of material to get down to where the finish hadn't soaked through.


I gave the whole top 2 healthy coats of wood conditioner, wiped off the excess, then poured some stain into a finish cup.


After waiting 2 hours, I applied the second coat of stain to ensure an even coat. You can start to see the finish really bring out the color here. It was a pain in the butt, but I'm really glad I decided to refinish this piece.


Wiping off the excess stain. While that cures over the next 2 days, I'll be milling an installing face frame material to help shore up the cabinet, cutting a profile in the shelves, drilling holes for wires, cutting the log details,  and doing some glue up and finishing.